Minecraft is an incredible sandbox game that allows players to unleash their creativity by building virtually anything, including cars! While cars in Minecraft can’t function like real-world vehicles, you can create detailed stationary cars for aesthetic purposes or even moving cars using Redstone mechanics. This guide will explain everything in detail and provide a step-by-step process for both options.
Why Build a Car in Minecraft?
Building a car in Minecraft is a fun and creative project that enhances your gaming experience. Cars can:
- Decorate Your World: Add modern, urban vibes to your towns or cities.
- Showcase Creativity: Experiment with different materials and designs to build cars ranging from sports cars to trucks.
- Learn Redstone Mechanics: Constructing a moving car allows you to develop Redstone skills, which are valuable for other advanced builds.
Whether you want a realistic display piece or a functioning car, this guide will walk you through the entire process.
Materials You Need to Build a Car in Minecraft
For a Stationary Car:
- Building blocks (e.g., Quartz, Concrete, or Wool)
- Slabs (matching block color)
- Stairs (matching block color)
- Black Concrete or Coal Blocks (for wheels)
- Glass Blocks or Panes (for windows)
- Buttons, Levers, Trapdoors, and Item Frames (for detailing)
For a Moving Car:
- Sticky Pistons
- Slime Blocks
- Observer Blocks
- Redstone Blocks
How to Make a Car in Minecraft: A Step-by-Step Guide
Let’s dive into the process, starting with a simple stationary car for decoration and moving on to a moving car using Redstone mechanics.
Step 1: Building a Stationary Car
A stationary car is perfect for enhancing your world’s aesthetic. Here’s how to do it:
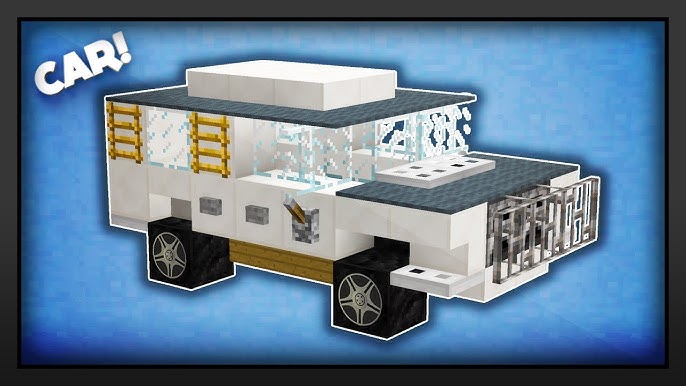
Step 1.1: Lay the Foundation
- Choose a flat location for your car.
- Place four Black Concrete or Coal Blocks in two pairs, leaving a 3-block gap between the front and back wheels.
Step 1.2: Build the Car Body
- Use a vibrant block, such as Red Concrete or Quartz, for the main body.
- Fill the space between the wheels with these blocks, creating the base layer.
- Extend the base to your desired car length (usually 5-7 blocks).
Step 1.3: Create the Interior
- Add Stairs to serve as seats. Place them on the base, leaving space for a driver and passenger.
- Use Signs or Item Frames on the sides of the stairs for armrests.
Step 1.4: Add Windows and Roof
- Use Glass Blocks or Glass Panels to create windows.
- Place the glass above the car body, ensuring there’s enough space for visibility.
- Add Trapdoors or Slabs on top for a sleek roof design.
Step 1.5: Add Details
- Attach Buttons on the wheels to mimic hubcaps.
- Use Levers or Trapdoors to represent door handles.
- Place Item Frames with Maps, Banners, or custom items to resemble license plates or headlights.
Step 2: Building a Moving Car
If you’re ready for a more advanced project, create a moving car using Redstone components. This requires precise placement of blocks and an understanding of Redstone mechanics.
Step 2.1: Start with the Base
- Place a Sticky Piston on the ground.
- Attach a Slime Block in front of the Sticky Piston.
- Create a rectangular platform using more Slime Blocks for the car’s base.
Step 2.2: Add Wheels
- Use Black Concrete or Coal Blocks as wheels.
- Attach these to the sides of the Slime Block platform, ensuring they’re part of the slime structure.
Step 2.3: Add a Propulsion Mechanism
- Place an Observer Block facing the direction you want the car to move.
- Behind the Observer, add another Sticky Piston, pointing toward the Slime Block base.
Step 2.4: Activate the Movement
- Place a Redstone Block in front of the Observer to power the mechanism.
- The Observer will detect the update, triggering the Sticky Piston and moving the car forward.
Step 2.5: Test Your Car
- Clear any obstacles around your car to ensure it can move freely.
- Place and remove the Redstone Block to start and stop the movement.
Pro Tips for Success
- Experiment with Colors and Materials: Use different blocks to mimic specific car designs, such as race cars or vintage vehicles.
- Understand Redstone: Test your moving car creatively to get familiar with how Redstone, Observers, and Pistons work.
- Customize Details: Add banners, buttons, or trapdoors to make your car look more realistic.
- Stay Within Piston Limits: Pistons can only push up to 12 blocks, so keep your moving car design compact.
Conclusion
Building a car in Minecraft is an enjoyable project that blends creativity with problem-solving. Whether you’re crafting a stationary car for visual appeal or a moving car powered by Redstone, this guide has provided the steps to make it happen.
Start with a basic design, then challenge yourself with advanced features to showcase your skills. With practice, you’ll create stunning vehicles that make your Minecraft world stand out!
People Also Ask
How do you make a stationary car in Minecraft?
Four black blocks for wheels, body with Quartz or Concrete, stairs for seats, and glass for windows. Buttons for hubcaps and levers for door handles.
What materials do you need to make a car in Minecraft?
Quartz or Concrete for the body, Black Concrete for wheels, Glass for windows, Stairs for seats, and Buttons for details. For moving cars, Sticky Pistons, Slime Blocks, and Redstone.
How do you make a moving car with Redstone in Minecraft?
Sticky Pistons with Slime Blocks for the base, Observer Blocks to activate pistons, and Redstone to make it move. Black Concrete for wheels.
Can you make a realistic car in Minecraft?
Yes, use Concrete for a smooth look, stairs and slabs for curves, and glass for windows. Item frames for details like headlights and license plates.
Tips for building cars in Minecraft?
Start simple, try out materials, and learn Redstone for moving cars. Don’t go over piston limits and use small details like item frames and banners.
